|
|
คุณสแน๊ป Snapnap.jjp@gmail.com094-424-6252 ID LINE : Snapnap. |
|
|
คุณมิ้งค์(ประชาสัมพันธ์) atchara.jp09@gmail.com092-455-4525 ID LINE : me-miki |
|
|
คุณแอน asulawann@hotmail.com094-892-2466 ID LINE : sulawan26 |
|
|
คุณอุ้ม aum20092009@windowslive.com 088-7583745 ID LINE : 0628238718 |
|
|
คุณโน๊ต tokyosunset@gmail.com094-197-4644 ID LINE : nottosan |
|
|
คุณออย sumonta_oil@hotmail.com092-914-4422 ID LINE : oiljjpp |
|
|
คุณแหม่ม mammee2522@gmail.com094-9955696 ID LINE : 0873872696 |
|
|
คุณนินิว newnaka_jjp@hotmail.com088-2892369,099-4541449 ID LINE:0875970137 |
|
|
คุณแอน chatwadee.srl@gmail.com096-1565393 ID LINE:0961565393 |
|
|
คุณปุ้ม pum_ka18@hotmail.com093-3992566 ID LINE: kanita.k |
|
|
คุณนัท nut_nut33@outlook.com088-2740420 ID LINE : nut-nutty- |
|
|
คุณแอน ann_amari@hotmail.com065-641-4247 ID LINE : anamr.n |
|
|
คุณแนน nanny_jjp@hotmail.com080-585-4546 ID : nanny-tiger |
|
|
คุณบอส 095-126-9999 ID LINE : @jjpsupply |
piboon@jjpsupply.comID LINE : @jjpsupply |
เพียงอีเมล์เดียว
รุ่น : No.2008-25x
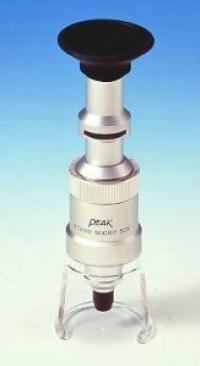
Peak Stand Microscope is a small size, lightweight and conveniently portable microscope. It is designed to cover the range in between the high-grade, heavily equipped microscopes and the various magnifiers 3x-30x) developed by Peak. It can easily, speedily and accurately catch the subject to be examined with its bright and superior resolving power and smooth-working mechanism.
This microscope is convenient for measuring the thickness, height or depth of subjects having different levels and for measuring the depth of items like print cylinders, printing plates and other similar applications.
The precision made focusing ring, simplifies operation, and the attachable/detachable rubber eyepiece increases the ease in operation.
A scale is built into the scale chamber above the focusing ring
The lens barrel of the eyepiece is the visibility adjustment ring.
First turn this ring and set it at the position where the scale can be seen clearly.
Then turn the focusing ring refocus on the next level.
By reading the scale engraved on the focusing ring and the main needle of the lens barrel, depths can be measured with the accuracy of 0.1mm (.004").
This scale can be easily interchanged according to use. Three kinds of scales-standard, for tooling, for printing are available.
Peak Stand Microscope is ideal for use in factories, inspection rooms and research laboratories.
Magnification 25X
Field of View 3.30 mmø
Min. Scale Div.No. 24 = 0.05mm
No. 26 = 0.002"
Measuring Range 3.0mm
Working Distance 17.0mm
Numerical Aperture 0.11
Focal Distance 19.8mm
Size (mm) 41.5øx122
Net Weight 83 g


